When I’m at my desk during the week and have written new code, I always create a new unit test file, and it looks something like this:
I asked myself two questions:
Why do I create a new testcase class for every new class?
Why do all of the tests I have always contains four-steps?
History of XCTest and xUnit
XCTest is based off of OCUnit and falls under the family of xUnit testing frameworks. xUnit is the collective name for several unit testing frameworks that derive their structure and functionality from Smalltalk’s SUnit [1], notably JUnit, which was also authored by Kent Beck [2]. In March 1998, OCUnit was written by Sen:te using Kent Beck’s description of the Smalltalk testing framework [3]. Understanding the origins of XCTest and JUnit helped me discover that most of the testing habits I have today all derive from Kent Beck’s Simple Smalltalk Testing: With Patterns.
One Testcase Class
I recommend that developers write their own unit tests, one per class. The framework supports the writing of suites of tests, which can be attached to a class. I recommend that all classes respond to the message “testSuite”, returning a suite containing the unit tests.
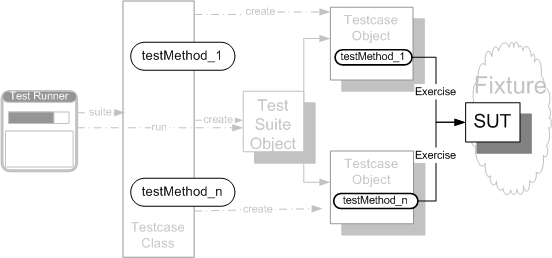
It was Kent Beck’s philosophy that led to the practice of creating one testcase class per class. Beck believed that test logic should be encoded as a single test method on some class [4], and a testcase class gives you a place to group these similarly related test methods [5]. Making test methods instance methods of a testcase class and creating a testcase object for each test, allows us to manipulate the test methods at runtime, such as running a single test case, a group of test cases, or skipping a particular test case [6].
Source: xUnitPatterns
Four-Phase Test
Source: xUnitPatterns
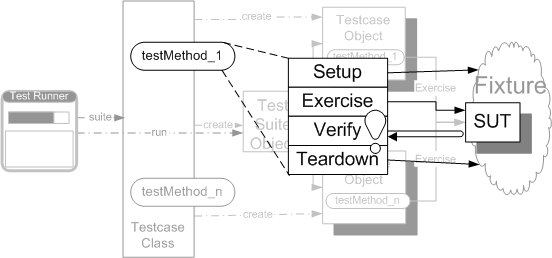
The idea of having a setup method, a test method, then a tearDown method come from Beck’s work, and has been formalized into what is called the Four-Phase Test. In the Four-Phase Test, every test has four distinct phases that are executed in sequence: setup, exercise SUT (system under test), result verification, and fixture teardown [6]. The purpose of creating clear distinctions in the phases was to make the system under test extremely obvious.
The inspiration for the design was based around the fact that automated tests should serve at least two purposes:
First, they should act as documentation of how the system under test (SUT) should behave; we call this Tests as Documentation. Second, they should be a self-verifying executable specification.
— Gerard Meszaros, xUnitPatterns
The Four-Phase Test can be thought of as a state machine. In the fixture setup phase, the test establishes the prior state of the world. In the second phase we interact with the SUT, which transitions us to the next state. In the third phase we analyze the post state of the world and verify that it meets our expectations. Then in the fourth phase, we reset the state of the world prior to running the test.
Conclusion
Unit testing may sometimes become a laborious process, so it’s refreshing to take a step back and understand why we do the things that we do. The inspiration of unit testing frameworks in iOS or OS X has been around since the first version of SUnit in 1994 [7], and given that unit testing hasn’t changed much since then, it seems that the paradigms of one testcase class per class and four-phase testing are here to stay.
1. Open Quickly (Command-Shift-O)
2. View Related Files From Toolbar
3. Use breakpoint actions such as log message or play a sound to avoid recompiling.
4. Use debugDescription.
5. Use Objective-C Subscripting.
Common Error: When I first uploaded my repo to Jenkins, I got an error about Jenkins not being able to clone a submodule for Cocoapods, and if you're having this issue you have to make sure to delete anything related to Cocoapods in your .gitmodules file.
Common Error: We added KIF to our project as a cocoapods dependency, but your app will be rejected if you include it in the build you submit to the app store. The solution is to only include KIF for your test target that uses KIF and not your App Store release version of your app. This can be done in your cocoapods file.
Example:
For command line builds XCode defaults to release version (which you can change), and my KIF tests were in the target IntegrationTests.
target :release, :exclusive => true do
  link_with 'IntegrationTests'
 pod 'KIF', '~> 0.0.1'
end
KIF.podspec
Pod::Spec.new do |s|
  s.name         = "KIF"
  s.version      = "0.0.1"
  s.summary      = "KIF, which stands for Keep It Functional,
is an iOS integration test framework."
  s.homepage     = "https://github.com/square/KIF"
  s.license  = 'MIT'
  s.author       = 'efirestone', 'jpsim'
  s.source       = { :git => "https://github.com/square/KIF.git",
 :commit => "ed057a038f07232e351210e56971fd9440acdd42" }
  s.platform     = :ios, '5.0'
  s.source_files = 'Classes','Additions',
  s.frameworks = 'UIKit', 'Foundation'
end
4. Install Jenkins with homebrew:
$ brew install jenkins
5. Add an alias to your .bashrc file and add an alias to start and stop Jenkins.
.bashrc
alias jenkins_start="launchctl load /usr/local/Cellar/jenkins/1.499/homebrew.mxcl.jenkins.plist"
alias jenkins_stop="launchctl unload /usr/local/Cellar/jenkins/1.499/homebrew.mxcl.jenkins.plist"
6. Start Jenkins server by typing the command in terminal:
8. In Jenkins, create a job and execute a shell script with the following command:
make test
9. Create an output job to publish the JUnit XML output. By default, the XML results are located in the PROJECT_NAME/build/test-results folder.
10. Save and apply settings.
11. In XCode, add a Run Script build phase and add these scripts in the folder that contains your Xcode project.
sh RunTests.sh
RunTests.sh
#!/bin/sh

# If we aren't running from the command line, then exit
if [ "$GHUNIT_CLI" = "" ] && [ "$GHUNIT_AUTORUN" = "" ]; then
  exit 0
fi

export DYLD_ROOT_PATH="$SDKROOT"
export DYLD_FRAMEWORK_PATH="$CONFIGURATION_BUILD_DIR"
export IPHONE_SIMULATOR_ROOT="$SDKROOT"
#export CFFIXED_USER_HOME="$TEMP_FILES_DIR/iPhone Simulator User Dir" # Be compatible with google-toolbox-for-mac

#if [ -d $"CFFIXED_USER_HOME" ]; then
#  rm -rf "$CFFIXED_USER_HOME"
#fi
#mkdir -p "$CFFIXED_USER_HOME"

export NSDebugEnabled=YES
export NSZombieEnabled=YES
export NSDeallocateZombies=NO
export NSHangOnUncaughtException=YES
export NSAutoreleaseFreedObjectCheckEnabled=YES

export DYLD_FRAMEWORK_PATH="$CONFIGURATION_BUILD_DIR"

TEST_TARGET_EXECUTABLE_PATH="$TARGET_BUILD_DIR/$EXECUTABLE_PATH"

if [ ! -e "$TEST_TARGET_EXECUTABLE_PATH" ]; then
  echo ""
  echo "  ------------------------------------------------------------------------"
  echo "  Missing executable path: "
  echo "     $TEST_TARGET_EXECUTABLE_PATH."
  echo "  The product may have failed to build or could have an old xcodebuild in your path (from 3.x instead of 4.x)."
  echo "  ------------------------------------------------------------------------"
  echo ""
  exit 1
fi

# If trapping fails, make sure we kill any running securityd
#launchctl list | grep GHUNIT_RunIPhoneSecurityd && launchctl remove GHUNIT_RunIPhoneSecurityd
#SCRIPTS_PATH=`cd $(dirname $0); pwd`
#launchctl submit -l GHUNIT_RunIPhoneSecurityd -- "$SCRIPTS_PATH"/RunIPhoneSecurityd.sh $IPHONE_SIMULATOR_ROOT #$CFFIXED_USER_HOME
#trap "launchctl remove GHUNIT_RunIPhoneSecurityd" EXIT TERM INT

RUN_CMD="\"$TEST_TARGET_EXECUTABLE_PATH\" -RegisterForSystemEvents"

echo "Running: $RUN_CMD"
set +o errexit # Disable exiting on error so script continues if tests fail
eval $RUN_CMD
RETVAL=$?
set -o errexit

unset DYLD_ROOT_PATH
unset DYLD_FRAMEWORK_PATH
unset IPHONE_SIMULATOR_ROOT

if [ -n "$WRITE_JUNIT_XML" ]; then
  MY_TMPDIR=`/usr/bin/getconf DARWIN_USER_TEMP_DIR`
  RESULTS_DIR="${MY_TMPDIR}test-results"

  if [ -d "$RESULTS_DIR" ]; then
 `$CP -r "$RESULTS_DIR" "$BUILD_DIR" && rm -r "$RESULTS_DIR"`
  fi
fi

exit $RETVAL
RunIPhoneSecurityd.sh
#!/bin/sh

set -e
set -u

export DYLD_ROOT_PATH="$1"
export IPHONE_SIMULATOR_ROOT="$1"
export CFFIXED_USER_HOME="$2"

"$IPHONE_SIMULATOR_ROOT"/usr/libexec/securityd